LTspice Tutorial - how to use this program
A short introduction into LTspice circuit simulation program
The Interface
LTspice IV is a very simple and accurate tool to provide circuit simulation. The system is totally free, it can work in Windows, Mac OS X or Linux using Wine. There is one very interesting feature in this program - the result of simulation can be written into a wav file, so you can play this file to hear the result.
Download LTspice IV here: http://www.linear.com or here (a direct link): LTspiceIV.exe (15 MB). Additional libraries can be downloaded from here and here. (registration required)
After install, click on the program icon and you'll see the main program window:

Now you have to create a new schematic file (from menu File --> New schematic), it will activate almost all icons in the top toolbar:

Apart from icons in the top toolbar, there is some useful function keys:
|
|
All this functions also accessible via the Edit menu.
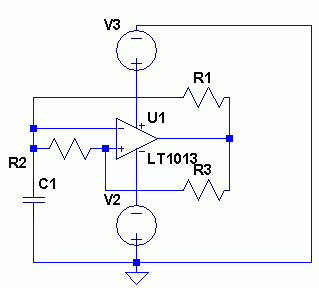
Example: how to create an op-amp based relaxation oscillator.
Press the key F2, it will show the window that allows you to choose a component, then select [opamps] (use double click), and choose an op-amp you want, in this example we will use LT1013:


Now click somewhere on the schematic, in a place you want to put the opamp:

After the opamp is placed on the schematic, press ESC key to quit the current component selection mode. Now again press F2 key and in the component selection window go to the root directory. Select there the voltage component - this is the power supply, put it on the schematic in two places - click there twice - above and below of the op-amp:

While the cursor has the shape of a component, it is possible to rotate it using the key combination Ctrl+R (see the hint in the bottom status bar of the main window). If a component is already placed on the schematic, press the key F7 (or use the Move button from the top toolbar), click on the component and press the key combination Ctrl+R.
Now put all other components on the schematic:

Use the key F3 to draw wires and the key F5 to delete a wire:
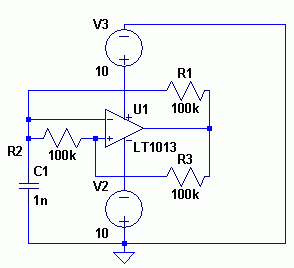
Now we need to enter component values for the capacitor C1, resistors R1, R2, R3 and power supply V2, V3. Move the cursor to a component, then press the right mouse button, here it the example for the capacitor C1:

The capacitor C1 value is 1n, i.e. 1000 pF, because symbol n means "Nano" prefix, it is equal to 10-9. There is another prefixes:
|
|
For the capacitance value of, for example, 100 pF, use designation of 100p, for 0.1 μF - 0.1u, for 1 Farad - 1 (just 1, with no prefix). The decimal point (".") is used as a decimal symbol. The lower and uppercase are treated the same way (you can use 1n or 1N, it's the same). The E notation can be used instead of decimal form, for example, 1n9 = 1900 pF.
Next, enter values for resistors, they are all of 100 Kohms:

Instead of 100k you can use 0.1meg, it's the same.
For voltage sources enter 10 volts for each one:

At the end, when all component values are entered, we will have this schematic:
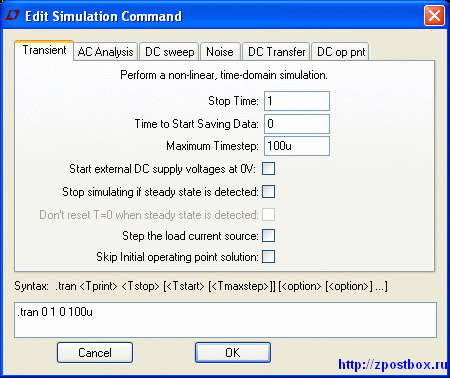
And now we have to set up a simulation mode. Select the Edit simulation Cmd from the menu Simulate, and fill the three upper fields of the first tab (Transient) for transient analysis:

- Stop Time = 0.01
- Time to Start saving Data = 0
- Maximum Timestep = 1u
Let's explain what it means:
0.01 - this is the full simulation time;
0 - the start time for a data to display;
1u - the maximum time step (the less it is, the more accurate plot we get, but it takes more time).
The lower field (.tran 0 0.01 0 1u) is filled automatically, it has all the parameters described above.
Now close the window Edit simulation Cmd, and place the text command somewhere on the schematic:
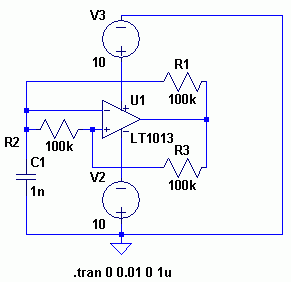
And save the schematic (select from the menu File --> Save As).
To start the simulation, press the "Run" button from the top toolbar or select the command Run from the Simulate menu. You'll see the blank window of simulation. Hover the cursor over a node of the schematic (the cursor will change to a probe), and press the left mouse button. Now you'll see a voltage plot in the simulation window.

To add a plot to the plot pane, click on the other wire while pressing the Ctrl key. Hover the cursor over a component, the cursor will change to a current clamp, and if you click, you'll see on the plot pane a current, flowing through the component.
To remove a plot from the plot pane, use Delete tool (press the key F5), you'll see the scissors shaped cursor.
How to write the signal into a file.
You have to label a node for the wire, from which the signal will be taken. Press the key F4 or select the command Label Net from the Edit menu:

Name the node with a name, in this case it is named out, and put it on the schematic (on a wire):

Next, press the key S (or select the command Spice directive from the Edit menu), and type there this line:
.wave ./file.wav 8 11025 V(out)

Be sure that the switch Spice directive is on.
The line .wave ./file.wav 8 11025 V(out) means that the signal will be written into the file with the name file.wav that will be created in the same directory as the schematic file. This wav file will have 8 sampling bits per channel and a sample rate of 11025 Hz. You have to use standard audio parameters for the signal, or else you will need to resample the wav file to listen it on your computer. You can write this file in any other directory, just change the path to the file: .wave c:/file.wav 8 11025 V(out).
To make the playing time longer we have to increase the simulation time, and increase the maximum timestep to accelerate the simulation:
Here is one important note: the amplitude of a signal has to be in the range -1..+1 volts or amperes, or the signal will be distorted.
Let's change the circuit by adding a three stage RC filter and a voltage divider R7, R8:

Now in the node out the signal is almost sine wave:

Note, that if you are zooming the plot between two points with the spatial period, in the bottom status panel you'll see the signal frequency, in this example it is 1.35 KHz (the accuracy depends on the cursor positioning).
The audio file converted into MP3 format can be listen here: ltspice.mp3.
The file with the last schematic can be downloaded here.
How to use libraries in the LTspice.
Warning! By default, there is no CD4000 library in LTspice program, you have to download it here: CD4000.zip. Copy whole the directory CD4000 into LTspiceIV\lib\sym\CD4000, copy files CD4066B.lib and CD4000.lib into LTspiceIV\lib\sub directory.
Let's draw the schematic of the Schmitt trigger oscillator:

The logic gate CD40106B can be found in the [CD4000] directory (press the key F2 to go there):

Set the time and Maximum Timestep of the simulation (0.001 and 100u):

But when you'll try to run the simulation, you'll get the error message of "Unknown subcircuit":

This means that the library with the gate CD40106B is not found. We have to include the library in the schematic. To do this, press the key S (or use the menu File --> Spice directive), in the Edit window enter the command .lib cd4000.lib:

Be sure that the switch Spice .lib directive is on.
Now run the simulation and click the output of the logic gate, you'll set the result of the simulation:
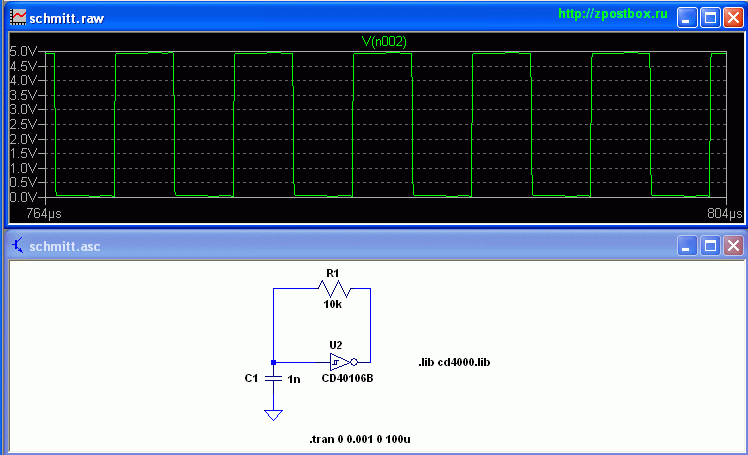
The file with the Schmitt trigger can be downloaded here.
How to start the simulation of an astable multivibrator circuit in the LTspice.
Let's draw the classic astable multivibrator circuit, it is based on bipolar transistors, we can use here, for example, 2N2222.

Note, that there is a text OUT on the wire at the right side of the schematic - this is the label of the node, press the key F4 to create it (or use the menu Edit-->Label Net) and place it on a wire you want to label:

Just type the word OUT in the field and close the form (and press the button OK), you don't need to do anything more.
Now we have to setup a simulation command (in the menu Simulate --> Edit Simulation Cmd): .tran 0 0.01 10n (Stop Time - 0.01, Time to Start Saving Data - 10n)
If we will try to start the simulation (click the key Run in the top toolbar), there will be no oscillation. It fails because the circuit is symmetric - all components from the left side of the schematic (except the voltage source V1) are the same as all components at its right side, so parameters of transistor Q1, Q2 are the same and so on. In real circuits it's never happen.
There is some ways to solve this problem. Let's see the first one. We can change a component (any one) value just a little bit:

As we can see, the value of the resistor R2 is increased to 100.01 kΩ. But this is not enough, oscillations will not start. We need to add the startup directive to the simulation parameters - in the menu Simulate --> Edit Simulation Cmd check the option Start external DC supply voltages at 0V:

Now the line with simulation parameters will look like this: .tran 0 0.01 10n startup.
The directive startup means that independent sources will be ramped on during the first 20 microseconds of the simulation (check out the voltage across the voltage source V1 to see the voltage ramp). Now the astable multivibrator works:

The second way to start oscillations. Lets' change the resistor R2 value back to 100 kohms and uncheck the startup option. Now place the SPICE directive .ic V(OUT)=5 on the schematic. This directive sets initial conditions of simulations, in our case it sets the voltage of 5 volts at the node OUT on startup. To add this directive, press the key T or select the Text item from the menu Edit:

Make sure that the option SPICE directive is checked, then the text text will be treated as a directive! Press the button OK, and place the text somewhere on the schematic:

The directive .ic V(OUT)=5 sets the initial voltage of 5 volts at the point OUT in the moment when the power supply voltage is applied to the circuit. After that, when the DC analysis is completed, the initial voltage went off. And now the astable multivibrator works:
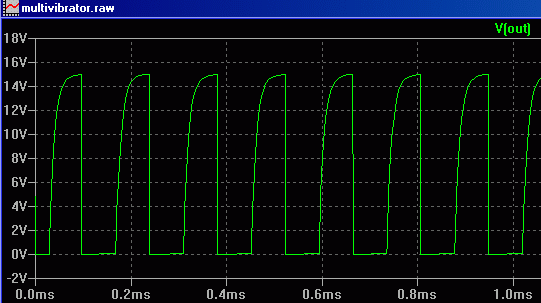
The circuit schematic of the astable multivibrator can be downloaded here: multivibrator.asc.
See also LTSpice: how to use the Current Controlled Switch